Monday, November 23, 2020

Stuffing

While my family is completely content with Stove Top stuffing, this recipe truly is worth the effort.  And really, it's not too much effort.  The hardest part is getting the bread cubes dried in advance of when you need them...and that just requires thinking ahead and some room to leave them out.  If you get in a pinch, though, I'm sure you could just bake them in a warm oven...or just buy some plain croutons at the store.  I got the recipe here.

Ingredients

loaf cornbread (see my skillet cornbread recipe)

loaf Italian bread, such as ciabatta

loaf French bread

whole large onion or 2 medium onions, diced

stalks celery, diced

1/2 

bunch parsley, chopped

1/2 c. 

(1 stick) butter

6 c. 

low-sodium chicken broth, more if needed for moisture

1/2 tsp. 

dried basil

1/2 tsp. 

ground thyme

1 tbsp. 

fresh rosemary, finely minced

Salt and pepper

Directions
  1. Cut all the bread into 1-inch cubes and lay them out on sheet pans. Cover with a dish towel and let them dry out for 24-48 hours until they're dry and crisp.
  2. Melt the butter in a large skillet. Add the onions and celery and cook for 3-4 minutes. Add the broth, parsley, rosemary, basil, thyme, salt, and pepper and stir.
  3. Put all the bread cubes in a large bowl and slowly ladle in the broth mixture, tossing as you go until the dressing has the moisture level you want. Taste and add more seasonings as needed.
  4. Pour the dressing into a large casserole pan and/or the turkey cavity. Bake the casserole for 20 to 30 minutes at 375 degrees until golden and crisp on top. Serve piping hot with a turkey and gravy!
Sunday, November 22, 2020

Easy Fluffy Blender Rolls

 The family really loved these rolls.  I doubled the batch and made 2 trays of crescent rolls, and 2 trays of cinnamon rolls.  Easiest cinnamon rolls ever!  I used 4 cups of whole wheat flour in the double recipe, and the rolls were still very light and fluffy.  I got the recipe here.

YIELD: 24 ROLLS
 
PREP TIME: 1 HOUR
 
COOK TIME: 17 MINUTES
 
ADDITIONAL TIME: 3 HOURS
 
TOTAL TIME: 4 HOURS 17 MINUTES

INGREDIENTS

  •  2 1/2 cups hot water (not boiling; just hottest water from tap)
  •  1/2 cup (1 stick, 4 ounces) butter (I use salted)
  •  1/3 cup granulated sugar
  •  2 teaspoons salt
  •  2 large eggs
  •  7 cups (35 ounces) all-purpose flour (see note)
  •  1 1/2 tablespoons instant yeast (see note for active dry yeast)
  •  6 tablespoons butter, melted

INSTRUCTIONS

  1. To a blender, add the hot water, butter (I just throw the whole stick in there), sugar, and salt. Blend for 10-15 seconds until well-combined. Add the eggs and blend until smooth.
  2. In a large bowl, whisk together the flour and yeast.
  3. Pour the wet ingredients over the flour and stir with a spoon (or use your hands) until well-combined and no dry streaks remain. The dough will be sticky and bumpy.
  4. Cover and let rise until noticeably puffy and doubled, about 1 1/2 to 2 hours.
  5. Divide the dough in half.
  6. For folded square rolls, on a lightly floured counter, roll half of the dough into a thick rectangle, about 9X14-inches. Cut in half lengthwise and then cut each half into six rectangle pieces. Dip the bottom of each piece in butter and swipe the buttered end back and forth on a half sheet pan and then fold in half (see pictures in post for a visual). Repeat with remaining dough, spacing the rolls about 1/4-inch apart.
  7. For crescent rolls, on a lightly floured counter, roll half of the dough into a thick circle, about 14-inches in diameter. Brush with melted butter. With a pizza cutter, cut into 12 equal pieces. Roll each piece up starting with the wide end and place on a parchment-lined half sheet pan. Repeat with remaining dough.
  8. Cover the rolls and let rise until puffy, about 1 1/2 hours.
  9. Preheat the oven to 375 degrees F. Bake for 15-18 minutes until golden. If desired, brush tops with melted butter while still warm.

NOTES

Yeast: I've only ever made this recipe with instant yeast (which doesn't need to be dissolved and proofed in liquid before using). If you want to use active dry yeast, use the same amount, but add it to the blender at the very end after adding the eggs and blend for just a second or two.

Flour: I use unbleached all-purpose flour; to measure the flour, fluff the flour very well, scoop in the cup and then level off with a knife. Don't pack the flour into the measuring cup or these rolls will be overfloured and dry. I haven't tried these rolls with 100% whole wheat flour, but I have subbed in two cups of whole wheat flour for two cups of white flour and it works great. I recommend using white whole wheat flour for a lighter, less dense roll.

Freezing: I haven't frozen the dough or the shaped rolls, but I have frozen the baked and cooled rolls, and they freeze great. Thaw at room temperature. They tend to dry out if warmed up too much, but they can be lightly warmed in a 200 degree oven for 10-15 minutes.

Doubling: this recipe doubles well. I use 2 1/2 tablespoons yeast for a double batch; everything else I double straight across.

Thursday, November 12, 2020

Chicken Curry (Yellow)

 This recipe is simple and flavorful.  My kids didn't clamor for seconds, but they ate it.  I call that a win!  Adults love it.  I got this recipe from my freshman-year BYU roommate Kristin Skinner.  

1 TBSP     butter
1 C.           chopped apple (I've always omitted these)
1 C.           sliced celery
1/2 C.        chopped onion
1 C.           chopped carrots
1 C.           cooked diced potatoes
1 can         chickpeas
1 clove      garlic - minced
2 TBSP     cornstarch
3/4 tsp.      salt
2 tsp.         curry powder (yellow)
3/4 C.        chicken broth
2 C.           milk
2 C.           cooked chicken - diced
1/2 C.        mushrooms - diced or sliced (I've always omitted these)

Melt butter.  Add (apple), celery, onion, garlic, and carrots.  Cook until onion is tender.  Combine cornstarch, curry, salt, broth.  Stir into onion mixture and add milk.  Cook and stir until mixture is thick and bubbly.  Stir in chicken, (mushrooms), chickpeas, and potatoes.  Heat thoroughly.  Serve over rice.

NOTE:  I wouldn't necessarily add both chicken and chickpeas.  If you want meat, use chicken.  If you want meatless, use chickpeas.  


Saturday, November 7, 2020

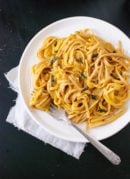
Creamy (vegan!) Butternut Squash Linguine with Fried Sage

This wasn't the kids' favorite, but they ate it ;).  Brett and I quite liked it, and you can't go wrong when your sauce is vegetable!  I found the recipe at cookieandkate.com.


  • Author: Cookie and Kate
  •  
  • Prep Time: 20 mins
  •  
  • Cook Time: 35 mins
  •  
  • Total Time: 55 minutes
  •  
  • Yield: 4 servings 1x
  •  
  • Category: Entree
  •  
  • Cuisine: Italian

4.5 from 143 reviews

Spiced and creamy (yet cream-less) butternut squash sauce tossed with whole grain linguine. Top with fried sage for a healthy, comforting main dish. Serve with salad or roasted vegetables to further lighten up the meal. Recipe yields 4 large servings.

SCALE

INGREDIENTS

  • 2 tablespoons olive oil
  • 1 tablespoon finely chopped fresh sage [I didn't use this.]
  • 2 pound butternut or kabocha squash, peeled, seeded, and cut into small 1/2-inch pieces (about 3 cups)
  • 1 medium yellow onion, chopped
  • 2 garlic cloves, pressed or chopped
  • 1/8 teaspoon red pepper flakes (up to 1/4 teaspoon for spicier pasta sauce) [I used 1/8 tsp, which gave it a little kick without heat.]
  • Salt
  • Freshly ground black pepper
  • 2 cups vegetable broth
  • 12 ounces whole grain linguine or fettucine
  • Optional additional garnishes: shaved Parmesan or Pecorino and/or smoked salt [We went no-cheese.]

INSTRUCTIONS

  1. Warm the oil in a large skillet over medium heat. Once the oil is shimmering, add the sage and toss to coat. Let the sage get crispy before transferring it to a small bowl. Sprinkle it lightly with salt and set the bowl aside.
  2. Add the squash, onion, garlic and red pepper flakes to the skillet. Season with salt and pepper. Cook, stirring occasionally, until the onion is translucent, about 8 to 10 minutes. Add the broth. Bring the mixture to a boil, then reduce the heat and simmer until the squash is soft and the liquid is reduced by half, about 15 to 20 minutes.
  3. In the meantime, bring a large pot of salted water to a boil and cook the pasta until al dente according to package directions, stirring occasionally. Reserve 1 cup of the pasta cooking water before draining.
  4. Once the squash mixture is done cooking, remove it from the heat and let it cool slightly. Transfer the contents of the pan to a blender, but keep the skillet handy. Purée the mixture until smooth (beware of hot steam escaping from the top of the blender), then season with salt and pepper until the flavors sing.
  5. In the reserved skillet, combine the pasta, squash purée and 1/4 cup cooking liquid. Cook over medium heat, tossing and adding more pasta cooking water as needed, until the sauce coats the pasta, about 2 minutes. Season with more salt and pepper if necessary.
  6. Serve the pasta in individual bowls topped with fried sage, more black pepper and shaved Parmesan/Pecorino and/or smoked salt, if desired.

NOTES

Recipe adapted from Bon Appetit’s Winter Squash Carbonara with Pancetta and Sage (February 2014).
Make it vegan: Skip the cheese garnish.
Make it gluten-free: Use gluten-free pasta. Commenter Jenn recommends corn and quinoa blended gluten-free pasta, which is firmer than brown rice pasta.
Change it up: The squash purée is a killer bisque, which you could thin with vegetable broth if you’d like. You could also stir it into risotto at the end of cooking.

Saturday, October 17, 2020

Apple Crisp - Freezer Friendly

This apple crisp is one of our favorite ways to use our abundant harvest of golden delicious apples.  We typically make a batch to eat, then 4-5 to freeze.  We've had some a year or two later, and they're still delicious.  The crumble recipe is, in my opinion, adequate for a full 9x13 pan of apples.  But nobody would say the crisp isn't delicious condensed to the 8x8 pan ;).  I found the recipe here.  Enjoy!

Homemade Apple Crisp

Apple Crisp is easy to make, super delicious and freezer-friendly! 
Prep Time10 mins
Cook Time30 mins
Total Time40 mins
 
Servings: 6
 

Ingredients

  • 2 cup firmly packed brown sugar
  • 2 cup flour
  • 1 cup old fashioned oats
  • 1/4 tsp cinnamon
  • 1/8 tsp nutmeg optional
  • 1 cup butter melted
  • 2 1/2 cups sliced apples

Instructions

  • Combine the sugar, flour, oats, cinnamon and nutmeg. Add butter and mix until crumbly.
  • Place apples in a greased 8 x 8 inch pan. Pour toppings over apples.

Make It Now

  • Bake in a 350 degree oven for 30 minutes. Serve with ice-cream or whipped cream.

Freeze It

  • Cover the apple crisp with plastic wrap and then wrap again with tin foil. Write the cooking directions on the foil and freeze.

To Cook From Frozen

  • Bake it in a 350 degree oven for 30 minutes. Serve with ice cream or whipped cream.

Notes

Tips
  • My favorite apples to use for this recipe are granny smith apples - the right amount of tart and sweet. If you don’t like granny smith apples and think they’re too tart? Try honeycrisp instead. Honeycrisp apples are a good alternative but they are slightly sweeter.
  • A pound of apples is about 3 cups of sliced apples depending on their size. So for this recipe I would use just under one pound of apples.
  • I love to add a big scoop of homemade vanilla ice cream to my apple crisp. You could add salted caramel sauce and cool whip. You could also sprinkle a little extra cinnamon sugar on top.

Tuesday, June 9, 2020

White Bean Salad with Grilled Zucchini and Corn

The kids didn't love this, but Brett and I both thought it was pretty good.  And healthy ;).  Find the recipe and full instructions here.


This grilled zucchini salad with corn and marinated white beans is a delicious summer dinner or side dish recipe that's as easy to eat as it is to make. 
 CourseMain Course, Salad, Side Dish
 CuisineAmerican, Gluten Free, Grain Free, Vegetarian
 Prep Time10 minutes
 Cook Time20 minutes
 Cooling Time10 minutes
 Total Time30 minutes
 Servings4

Ingredients

  • 1 can cannellini beans or 2 cups cooked from scratch
  • 1 tbsp chopped fresh rosemary
  • 2 tbsp extra virgin olive oil
  • 1 lemon zested and juiced
  • 1 clove garlic minced
  • 1 tsp honey (I don't love honey, so I left this out.)
  • 2 medium zucchini halved lengthwise (I used frozen zoodles)
  • 2 ears corn husks and silks removed (I used frozen corn)
  • 1 tbsp olive oil
  • 1 tsp salt
  • 1 tsp pepper
  • 1/2 c torn basil leaves
  • 1/4 c chopped pecans (we could take or leave these)
  • 4 tbsp shaved pecorino cheese (I left this out, of course.)

Instructions

  • Heat a grill over medium to medium-high heat. If using a charcoal grill, aim for 350-375*. 
  • Toss the cannellini beans with the fresh rosemary. 
  • Whisk together the extra virgin olive oil, lemon juice, lemon zest, garlic, and honey. Pour the lemon dressing over the beans and toss to combine. Set aside to marinate at room temperature for up to 30 minutes while you grill the zucchini and corn.
  • Brush the zucchini halves and and corn with olive oil, then sprinkle with salt and pepper. 
  • Place the zucchini cut side down on the grill, and place the whole corn cobs directly on the grill. Grill the zucchini 5-6 minutes, or until charred, then flip and grill an additional 5-6 minutes. Grill the corn a total of 18-20 minutes, or until charred on all sides, rotating a quarter of a turn every 4-5 minutes. Remove the zucchini and corn from the grill as they finish and set aside on a plate until cool enough to handle. 
  • Dice the zucchini, then slice the corn from the cobs. Add the grilled vegetables to the marinated white beans, then add the basil and chopped pecans and toss. 
  • To serve as an entree, divide the salad between four plates, then garnish with pecorino cheese to taste. Alternatively, serve as a side dish with pecorino cheese on the side. This salad keeps in the fridge without the cheese garnish for up to three days in a tightly sealed container and can be served cold or room temperature.